Showing posts with label Subaru Outback. Show all posts

2017 Subaru Outback Oil Drain Plug Head Rounded - First Oil Change

This seems to be a common problem - first oil change on a late model Subaru 2.5L engine - and the oil pan drain plug head gets rounded by your socket and you can't remove the drain plug. So - what to do? Trip to the dealer? I've been changing my own oil for many years - first time this has happenned to me. I decided to purchase a set of bolt extractors and sort it out myself. Here's how it went.
14mm Hex Head on the Drain Plug - Just rounded enough to make it impossible to remove
 I purchased a slightly used 2017 Outback with 17,000 km - lease return. At 25,000km I went to do my first oil change. The dealer had informed me that they had changed the oil at the lease return. When I went to remove the drain plug - I didn't lift the car because I thought I'd be able to spin it off with the car sitting on the ground (as I had done many times with my 2006 Outback - it sits high enough off the ground that you can slide the pan underneath and not have to lift the car to change the oil). This time it went differently - with the drain plug at an angle, and recessed slightly below the aerodynamic underbody cover - it's quite awkward to get a socket on the drain plug and apply the torque at an angle. It would be much easier with the drain plug oriented vertically. One bad move and I rounded the head.
Another view - Drain Plug accessible through a small access port, sits on an angle
 So - I put everything away, got online and ordered a set of chinesium bolt extractors. I've never tried these before, so this was an experiment for me. Using a ball pien hammer, I tapped the 14mm extractor onto the drain plug so that it was well seated, then popped on a short extension and used my Dewalt 3/8" impact gun which can generate about 100 ft-lbs of torque - and nothing moved - at all. I was stunned - 100 ft-lb of torque on a drain plug? Clearly not normal.
Dewalt 1/2" Drive Impact, 21mm deep socket, 14mm bolt extractor, and the drain plug in question
So - I pulled out the Dewalt 1/2" impact which can generate 400 ft-lbs of torque - and a 21mm deep impact socket to be able to fit over the extractor (instead of using the 3/8 socket drive square) and leaned on it. After about 15 seconds, the drain plug broke free and loosened, with no damage to the oil pan. The bolt extractor was hot to the touch from the impact force. The drain plug was well grooved from the force of the bolt extractor.

Check out the grooves on this drain plug head. Exctractor worked like a charm.
I installed a new Dorman replacement drain plug - with a larger hex head - and completed the oil change.

Bit of a mess - An angled drain plug will shoot your oil about 2 feet sideways
So - what do I think about this? Drain plug with small head - should be larger - like 19mm for a 16mm bolt size so that you can get a tool on the drain plug. Soft metal and the paint interferes with good contact with your socket. This plug should definitely be re-specified. The plug installed on an angle - shooting oil sideways? Brutal - plug should be installed vertically on the pan. I don't know if the dealer ever actually changed the oil - have sent the oil out for analysis to get an opinion on that. If you're in the same situation - up to you to decide what to do - take it to a dealer or extract the plug yourself. In my case - it worked out okay. Let me know if you have any questions.

In case you're wondering, the new drain plug is a Dorman 65325 - M16-1.50 threads. Nice piece with 17mm hex head - 3mm larger than the stock drain plug.

Dorman 65325 Oil Drain Plug

Update - December 2019:

6 months have gone by, did my second oil change. Drain plug spun off normally, no problem at all, oil change completed in 30 minutes. Definitely a manufacturing defect with the way the drain plug was delivered from the factory. Blackstone Labs oil analysis came back on the first oil change - they did not think that the oil had not been changed as described by the dealer - which was good news. It also meant that they must have sucked the oil oil out of the dipstick tube. FWIW.

Sources and Links

I hope you found this post useful. Feel free to ask questions in the comments section below. I answer all questions. If you're interested, you can help support this site by using the following links to Amazon.com in the United States.

Share:

Replacing a Battery Terminal Clamp on a Subaru Outback 2006

It came time to replace the battery on my 2006 Subaru Outback wagon. 8 years, 150,000 km travelled, and still working with the stock battery. Not bad. A few incidents this winter - leaving an interior light on for a few hours, and having problems starting the car led me to Costco for a very reasonably priced replacement Kirkland battery (very highly rated by Consumer Reports).

Replacing the battery was fairly easy and straightforward, I won't go into that here. But when it was time to tighten up the original battery clamp - there was no way I could get it to bind tight to the new battery post.

8 years life on this battery clamp - finished. Time for a replacement.
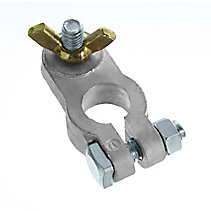
So, of course when your doing something on the weekend, there isn't an option to run to the dealer to get a replacement OEM battery clamp, and I wanted to get everything sorted out properly without wasting any more time. There are two cables which attach to this clamp on the vertical post on the clamp - pretty well identical to a standard marine terminal. So, off to Canadian Tire for a marine terminal.
Catalog photo - Canadian Tire Marine Battery Terminal - $5.99 each
This ended up being about a 10 minute job once I had the part. The metal of this clamp is soft and malleable - allows you to get a perfect fit on the battery terminal, without any gaps. Will result in excellent conductivity and low resistance. 
 Use a set of pliers to shape the terminal to the battery post
Install the cables using the provided wing nut, make sure everything is snug. Take care tightening the clamp bolt - the metal is quite soft.

A good coating of vaseline to protect the terminal from corrosion. You can also use a spray on producet for this purpose. 

And replace the insulating cover - this helps prevent a short in case of the hood contacting the battery in a collision.
10 minute job, and perfect conductivity. No issues with charging or starting, all good.


Share:

Aluminum Wheel Cleanup

This fall I purchased a second hand set of wheels to use for winter tires for the new station wagon. When I got them - they were quite badly encrusted in brake dust, I'm not sure if the previous owner ever cleaned them. Pressure washer and aluminum wheel cleaning products barely touched the brake dust stains. I then took it up a notch - and scrubbed the wheels with lacquer thinner and used terrycloth towels. That was really effective at removing the brake dust stains from the wheels, but you have to be careful - the lacquer thinner will soften the existing finish, and the fumes are hazardous - chemical gloves and a charcoal organic cartridge mask are a must if you're working indoors.

Once the wheels were clean - a new problem quickly became apparent - spots of oxidation underneath the existing finish - the size of quarters. Several per wheel. Not only that, but oxidation around the wheel rims where the tire bead contacts the rim. This oxidation will eventually cause air leaks and would have to be removed.


I decided not to completely strip the wheels, but to do a repair job and spot refinishing. That consisted of buffing out the oxidized areas with a 2" buffing wheel on a die grinder, and a sandpaper wheel on a dremel for tighter areas.

Next step was to prime the buffed out spots where I removed the oxidation to the bare metal. I used automotive self etching primer, decanted to an airbrush bottle and an airbrush for better control and even application. If you don't have an airbrush, you could mask and spray from the can, or decant and apply the primer with a brush. Here's a photo of the primer used, and the spot priming:


Once the spot priming was done, I decided to paint the interior of the wheel - silver metallic and clear. I did this before painting the fronts of the wheels, so that overspray would be less of a problem. I started by masking off the front of the wheel from the back:


I decided to go with a Lacquer paint system. These wheels were originally painted with Lacquer, so I was confident I'd have good compatibility. Plus - the recoat times with lacquers are extremely flexible - from 15 minutes to any time. From what I've found online, acrylic enamels are becoming more prevalent, probably due to tightening VOC emissions regulations. I went with the recoat flexibility - because with a couple small kids running around, and limited time to dedicate to painting, I could do some several evenings in a row and not have to finish all coats in the same day. I used duplicolor spray lacquer with these wheels - seems to be a very good product. Available at Canadian Tire - about $10 a can. 

Three coats of colour, and three coats of clear - on the inside of the wheels, and the bead surfaces. I did all the coats of colour in one evening, then waited 24 hours, and did the three coats of clear the next evening. After that, it was on to the fronts of the wheels. 

On the fronts of the wheels I gave up on the spot repair also. Since they are winter wheels, I didn't dedicate much time to level out the areas where I sanded - I just feathered the clearcoat back some so that the edges wouldn't be too jagged. I also sanded all surfaces to roughen them for paint adhesion. Since I was worried about the etching primer raising existing paint, I used a sandable primer over the existing finish (photo above). This sandable primer was a bit darker than I expected, I was hoping to keep everything light so that dings and scratches won't show through. By the way - I picked up the Rustoleum spray can trigger at home depot - this is the way to go. Each set of wheels took about one can of primer, three cans of colour, and two to three cans of clear. 
The finish turned out good - I applied colour about half an hour after the primer, and three coats about 15 minutes apart. Waited a day, and onto the clear. 


On two of the wheels, I applied the clear a bit too thick, and the solvents in the clear lacquer redissolved some of the colour layer. Once that happens, you pretty well have to start over. You can wipe clean with lacquer thinner and restart. I was pressed for time and just left it as is - not too noticeable, especially on wheels that will be crusted in salt most of the winter. 

I'll do another post on my outback wheels - which I stripped down to the aluminum using paint thinner. Those wheels turned out a bit better than these, and it didn't take any more time to strip the wheels down, compared to all the time spend cleaning, wiping with lacquer thinner, and sanding these wheels. If I was going to do it again, I would just strip them completely before starting...


Share: