Showing posts with label Appliances. Show all posts

Diagnosing Front Load Clothes Washer Vibration and Replacing Shock Absorbers

I picked up a used front loading washing machine a few weeks ago, and set about to see if I could get it to function properly without vibration. The previous owner indicated that the washing machine jumped around when in the spin cycle, and that the drum spider arm assembly had been recently replaced.

When I got the machine home, I removed the top cover and did a quick inspection. One issue popped out immediately - a detached drum weight which was resting on the door seal. 

Drum weight missing - should be installed on the four posts with screws


Drum weight reinstalled correctly, Soap Dispensor Removed for Access

I removed the entire soap dispensor assembly to give it a good cleaning, it had some black mould growing in the top and rails of the sliding soap tray. With the soap dispensor removed, I had good access to replace the drum weight and access all the fasteners correctly. I also needed to reinstall the door seal clamping wire correctly, it wasn't in place all the way around the door seal. 

Scrubbing clean the soap trays, receiver and cover

With the weight replaced, and the soap trays replaced, I ran some tests to check the level of vibration. I found that the machine was hopping when spinning up and spinning down at a particular frequency, a resonance issue. So the next step would be to replace the shock absorbers underneath the drum.

Dryer front removed for replacement of shock absorbers

While replacing the shock absorbers, I took the time to clean out the pump filter, and dust underneath the drum. 

It was then time to install the washing machine in the laundry room. I purchased a new set of 90 degree washer hoses so that I'd be able to get the machine nice and close to the wall. I zip-tied the drain hose to the drain pipe so that there was no way the drain hose could fall out of the pipe. 

Installing the washer. Magvent to the right. Dryer outlet moved up on the wall. Zip ties retaining drain hose. Insteon controller on the washer plug.

With the new shock absorbers I've solved the vibration problem, and the machine runs reliably now. Excellent upgrade for the laundry room. 


Share:

Laundry Room Reconfiguration and Magvent Installation

Our 30 year old house has a compact but functional laundry room, set up for top loading machines with the dryer on the left and the washing machine on the right. When upgrading to front loading machines, we learned that the front loader doors open to the left. If the machine is placed on the right of the dryer, the door will be in the way when transferring clothes. So - job number one will be to switch the washer and dryer placement. 

The completed installation - Washing machine on the left, dryer on the right

The second issue to be resolved is the location of the dryer vent outlet, the location of the dryer outlet plug, and the ability to get the machines close to the wall. In the current installation, the dryer vent outlet is on the side wall, and the dryer outlet plug is right at baseboard level - which causes the dryer vent and dryer power cable to interfere. This means I can only get the dryer about 5 inches from the wall, and I need a large loop of flexible duct to be able to make the connections with the machine pulled out from the wall before pushing them into place. 

Current installation - side vent outlet and power plug right at floor level

Current installation - Dryer vent interferes with power plug

With the power plug at floor level, it is very difficult to make connections with both machines in the laundry room at the same time. Installation gymnastics include climbing over the machines to get to the space behind the dryer to make or break connections to get the maching into place or removed. So another aspect of the project will be moving the dryer plug up on the wall and converted the current plug outlet box into a junction box. 

To move the dryer installation to the other side, I ran into an interference with the copper water piping running through the floor plate of the wall to the faucets for the washer. With limited access below the floor due to the placement of the furnace, I wasn't able to move the copper piping to be able to center the new dryer vent placement. I also wanted to get rid of the long flexible duct behind the dryer - and when researching this problem online, I found the Magvent dryer vent magnetic coupler. The Magvent comes with two magnetic elements - the outlet, with a magnetic ring and adapter for 4" round duct, and the part that goes on the back of the dryer - a short length of flexible duct with a second magnetic ring. 

Magvent flexible coupler - installs on dryer outlet


Magvent flexible coupler installed and compressed on the dryer

My installation options for the installation of the Magvent were quite limited, with the copper water pipe blocking a perfect centered location for the magvent. I had to offset the Magvent to one side, partially remove a 2x6 wall stud to give space for the duct coupler, and drill a 4 1/2" hole through the floorplate to route the duct through the basement to the rest of the extraction ductwork. 

Before closing the drywall, I created a drywall box within the wall so that the magvent opening would be sealed by drywall all around, to create a fire break and prevent dryer lint accumulation within the wall space. 

Magvent duct installed in-wall, with duct running down through floor plate

The arrangement worked quite well - with the dryer backed into the wall on the right side of the laundry room, the strong magnets in the Magvent made the connection with no issues, and I didn't have to hand upside down over the dryer connecting any 4" round worm clamps. 

Moving the dryer into position to couple the Magvent

With the dryer outlet moved up the wall - this also avoided any connection gymnastics, easy to reach over the dryer to connect and disconnect the dryer. 

Dryer plug moved up the wall, dryer vent moved from left to right

I've very happy with the completed installation, doors open in the correct way for easy transfer of laundry, and I've managed to get rid of a large loop of flexible duct behind the dryer for greater efficiency. I bought the Magvent at Lee Valley Tools online. 

Washing machine on the left, dryer on the right

I have a few other articles on this project:

1. Repairing and replacing the shock absorbers and drum weights on a front loading washer
4. Comparing the efficiency of an old top-load washer with a new front load washer. 

Feel free to ask any questions in the comments section below. 


Share:

Shop-Vac is going out of business

 You may not have heard, but Shop-Vac is in receivership. This was announced on September 18, 2020, but I only realized it when I needed a part that I accidently discarded after cleaning my large Shop-Vac. I went to their website and found all of their manuals and customer support information was offline. 

I've had one or two Shop-Vacs for as long as I can remember. As soon as I realized that getting a part might be difficult, I went to Canadian Tire and managed to find what I needed, however I was surprised to find the shelves almost bare of Shop-Vacs, parts and accessories. So I picked up a few spare dry pickup bags. 

Shelves are bare of Shop-Vac at my local Canadian Tire
Shelves are almost bare of Shop-Vacs at my local Canadian Tire

This company is an icon, and their components drove standardization in wet/dry pickup vacuums. Knock-offs abound, and accessories tend to be universal fit across brands now. Maybe this is the reason that they're in financial difficulty. Hopefully someone comes in and rescues the brand and the North American manufacturing facilities based in the Eastern United States. 


Share:

Solving slow clothes drying performance with an inline duct booster fan - Fantech DBF4XL

Since moving into our new house - we've seen our clothes drying times double. The clothes dryer gets very warm, but due to a long duct run to the exterior of the house - airflow is reduced. The duct run is about 30 feet, not including losses due to elbows and fittings. Large loads would take 2 hours to dry.
The Fantech DBF4XL Dryer Booster Fan with Pneumatic Sensing Control
Some research lead to inline dryer duct fans - which improve dryer performance by overcoming the duct loss due to the length of the duct. I have a standard clothes dryer with 4" diameter round ductwork. The ducts were all sheet metal ducts, with only a short length of flexible at the dryer connection, so the ductwork was already optimized by being as smooth and as short as possible to reach the exterior of the house.

Fantech DBF4XL - Serial Number Plate - On the Pneumatic Timer Control Box
I decided to go with a Fantech model with a pneumatic switch that automatically detects the change in air pressure in the dryer duct when the dryer is activiated, then turns on the booster fan in 10 minute timed periods. At the end of the 10 minutes - the booster fan switches itself off - and if the dryer is still operating - the pneumatic control turns the fan back on for another 10 minutes. I found the Fantech DBF4XL on eBay - previously installed but never used - for a good price.

Reading the installation instructions for the fan - they recommend the installation of a secondary lint screen upstream of the fan to help protect the fan from clogging with lint. When I opened my dryer duct - I had plenty of lint in the duct - which indicated that the lint screen in my dryer was passing a lot of lint - more on this later. So - onto eBay where I found a Fantech secondary dryer lint trap for a reasonable price.

Once the secondary lint trap and fan were received, I set to work. My dryer vent line ran through the basement under the first floor where the laundry room is. So - it was a simple matter to cut into the dryer line where it ran under the floor - and duct in the secondary lint trap and the booster fan.

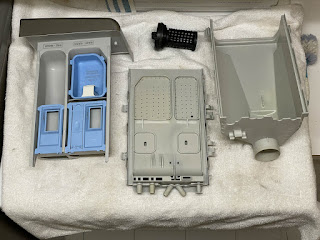
The secondary lint trap has a clear plastic window which helps to show when the filter box needs cleaning. It's a neat looking installation - but would be much more convenient installed directly behind the dryer.
Installing the Fantech Secondary Dryer Lint Trap - Note the Laser Line - Simplifies Lining up the Ductwork
The filter box ending up screwing directly into some wood cross members under the floor - straight through the base of the filter box. Very simple.
Fantech Secondary Dryer Lint Trap - Installing the Filter Box with the Cover Removed - Note the Laser Line
When installing the secondary lint trap and lining up the booster fan - I used a laser level with vertical laser line to line the filter box, fan and ductwork nice and straight - to have a professional looking installation. The laser really facilitates the installation.
Installing a wood block to install the Dryer Duct Booster Fan - Four Tapcon Screws into the Elevated Concrete Slab

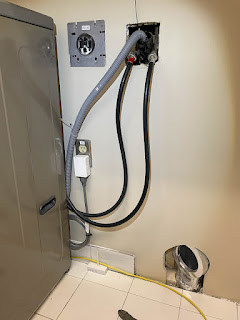
Secondary Dryer Lint Filter Upsteam of Dryer Booster Fan

Secondary Lint Filter and Dryer Booster Fan Installed
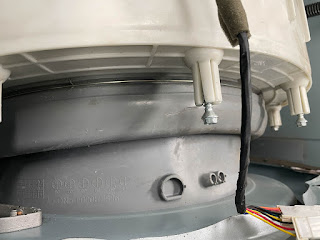
Very important installation point on the booster fan - the booster fan uses a pneumatic diaphragm switch - the copped colored cylinder in the photo below. The diaphragm needs to be oriented vertically so that gravity does not act on the diaphragm - which would work either for or against the pneumatic pressure and upset the operation of the switch - your switch would either be on all the time, or not activate reliably on duct pressure. It's very simple to rotate the fan on the installation bracket so that the diaphragm is vertical. When installing the bracket - take care not to install the self tapping screws to close to the center of the fan enclosure - you could screw into the fan impellor and block the impellor from turning. It's not as complicated as it sounds - you just need to take care with these points on installation.
Fantech Dryer Booster Fan - Note the Orientation of the Copper Colored Pneumatic Switch - This needs to be oriented vertically for it to work properly.

Conclusion

So - how does it work? Perfectly. It switches on and off automatically as described above. I haven't had any issues with the booster fan turning on when not required, and it recycles automatically in the ten minute intervals without any issue.  The secondary lint filter needs to be cleaned once every two dryer loads on average - which is more frequently than what I hoped. It would have been much more convenient to have the secondary filter installed in the laundry room - for easier cleaning - but this wasn't practical in my installation without adding a lot more ductwork. Something for me to consider in the future.

The dryer cycles have been reduced by almost one half, 2 hour dryer loads now dry in about an hour - and the automatic dry cycles now work reasonably well - before - the automatic dry cycles never got the laundry dry.

4 Year Update

Still working 100% reliably after 4 years - at least 6 laundry loads a week. The secondary lint filter is a MUST - it is amazing how much lint misses the dryer lint trap. Super impressed with the performance and durability of this fan - no problems at all. 

Sources and Links

I hope you found this post useful. Feel free to ask questions in the comments section below. I answer all questions. If you're interested, you can help support this site by using the following links to Amazon.com in the United States.

Share: