Showing posts with label Repair Kits. Show all posts

Repairing Cargo Latches and Replacing Seals on a 2001 27EXB (28E33B) Glendale Titanium 5th Wheel

We bought this 20 year old RV earlier this year. One item to repair were the cargo latches on the flip-up door next to the bunk beds. The spring action in the latch was weak - so when you depress the release tab, the lever would not spring up to open the latch. You would have to reach under the level with a fingernail and try to pop it up. In addition, the latch seals were completely rotten, allowing water to get into the door can causing the start of some black mould and rusty hardware.

Starting point - seal half gone, weathered latch body

Some exhausting internet research and I managed to find the same latch for sale on an Asian e-commerce site, however, the inside lever which holds the latch closed did not match my latches. I couldn't find an exact match anywhere, so I decided to order the similar latch and attempt to swap the inside levers from my old latches to the new latch body with new springs and lock cylinders. 

New latch with the shorter inner level. Drilling out the rivets holding the inner lever on the latch.

A few weeks later the new latches arrive, and luckily, they are physically similar. I start by disassembling the inner lever on one of the new latches by drilling out the rivets. The rivets are actually part of the inner lever casting - so when I did the same on the old latches I was very careful to remove a minimum amount of material with a twist drill to facilitate reassembly. 

With the rivets drilled out, the inner lever pulls apart from side to side.

It was then straightforward to transfer the inner levers from the old latch onto the new latch with new springs. The dimensions were all accurate, the o-ring seal which keeps water out of the latch mechanism was transferred off the old inner lever to the new inner lever and everything went back together with some gentle tapping and plier pressure. 

Old latch and inner lever - rivets drilled out and separating the two halves

Reassembling the old inner lever on the new latch - the wood protects the finish on the latch when tapping.

With the inner levers swapped, it was simple to reinstall the latches in the cargo door with the new seals provided with the latches:

New latch installed with new seals

Here's a photo of the old seal next to the new seal - this was the better of the two old seals - the other seal had completely disintegrated.

New and old latch seals

Finally - I reached out to the latch vendor, and ordered some spare sets of seals if you just want to replace your seals. Just click on this link to take you to the sales page on eBay.


Share:

Franke Sink Stopper - Leaky Seal Repair

We did a kitchen renovation about 10 years ago, and installed two side-by-side Franke stainless steel sinks. Total cost was substantial. Only three years after installation, the stoppers started leaking - if you filled the kitchen sink with water and walked away, it would be empty in about an hour. I did a bunch of research, and found that you could purchase a replacement rubber seal for the stopper, you could only purchase the entire stopper. Not particularly cost effective. 

Franke 1145 Strainer Assembly - Expensive way to replace the stopper seal

Note how the new seal on the stopper looks

So - I had a close look at the stopper and seal design, to try to determine why the stoppers were leaking. The seal is in the shape of a tee - with the base of the tee set into a groove on the stopper, and the sealing surface protruding perpendicularly from the base of the tee. When the stopper is set in place, the sealing surface is pushed laterally, and causes the base of the tee to rotate. If the seal rotates enough, you get metal to metal contact between the stopper and the drain fitting, and water can escape past the rotated seal. 

Left Stopper - normal seal. Right stopper - seal flipped down and leaking

I researched possible replacement seals - o-rings, or similar shaped seals and didn't find anything that would fit or seal. You can not purchase just the replacement seal from Franke - you can only purchase the entire replacement stopper. 

Seal removed from stopper - not available as a replacement part

Then, I figured maybe there's another way to prevent the failure mode - the rotation of the seal. What if I could add some support for the perpendicular sealing surface, prevent it from rotating. I found that a very small diameter o-ring stretched around the stopper, just above the seal, supports the seal and keeps it from rotating, and allows the sealing surface to do its job. I've had this fix now for over a year, and is completly reliable. 


Large o-rings, small cross section

Simple stretch the o-ring over top of the seal, snug it up against the metal body, and it will prevent the large stock seal from rotating and leaking water.

Look closely - note the o-ring avove the stock seal

Another view - O-ring above the stock seal
Works well. 

Share:

Rebuilding BMW Transmission Oil Cooler Hose Quick Connect Fittings

I pulled the BMW E61 into the garage last week to sort out a few issues - rear axle CV boots leaking, oil leak, and low boost pressure. On inspection, I found a leaking transmission oil cooler quick connect fitting, which was spraying oil on the charge air duct from the intercooler to the intake manifold.

The upper (pressure side) tranmission oil cooler quick connect fitting is leaking

I did some research on the internet, could not find any articles about people rebuilding these fittings. This hose costs $170 - expensive to replace for a simple leak. I figured since it was leaking anyway, I would try to take it apart and see if there were replaceable seals. The part numbers of the hoses affected are: 17227570973, 17227571978 and 17227571985.

Once the connection is separated, I took a pick and very easily removed two regular o-rings from the female side of the fitting.
It was easy to remove two standard o-rings from the fitting using a pick. I was careful not to scratch the inside of the connector shell. Once I had the o-rings removed, I noted there were two spacers made from plastic - one green spacer deep in the fitting, and one gray spacer just above the green spacer.

O-rings removed from the fitting, see the green spacer and gray spacer just above. 
The old o-rings were squared off, and not very pliable. They held their out of round shape upon removal. I measured the old o-rings and then estimated what the original uncompressed size would be. They appeared to be standard metric o-rings, and a quick trip to the local o-ring supplier yielded some potential replacements. 

Old o-rings above, new o-rings below. Two per fitting. 
Next step was to stuff the new o-rings into the fitting.  To start with, I used a pick to push the green spacer to the bottom of the fitting, and lift the gray spacer to the top of the fitting. This leaves a groove the width of two o-rings to fit the first replacement o-ring. I stuffed the o-ring into the fitting using some needlenose pliers. 

Start by pushing the green spacer to the bottom of the fitting.

Then - insert the replacement o-ring using needlenose pliers. 
I used the needenose pliers to insert the o-ring into the fitting just above the green spacer, and then to hold one side of the o-ring in the correct position while I used a screwdriver to massage the o-ring into position. With the first o-ring in place between the green and gray spacers, use your pick to push down the gray spacer (and the first o-ring) against the green spacer. 
First o-ring inserted above the green spacer. 
Next step, insert the second o-ring just above the gray ring just as before. With both o-rings inserted, I closed the fittings, cleaned them carefully to remove all traces of oil, so that any new leaks would be apparent. Following a run-up - the two fittings I repaired were both well sealed. I created this simple schematic showing how the o-rings stack in the fitting. 


If you're careful with the plastic ring and don't break it when disassembling the connection, you may be able to repair it. One other tip - if possible, before disassembling, wash the hoses with soap and water, and get into the release clip side of the fitting with a toothbrush to get as much grit and sand out of the fitting. Blow water out of the release clips using compressed air, and this will make the disconnection a bit easier. Comment below if you have any questions. 


Share:

Quickjack Portable Car Lift - Rubber Feet upgrade on Hydraulic Pump Unit

I picked up a Quickjack portable car lift for the BMW turbo replacement project, and really took advantage of it. Very solid, good lift height, quick lifting and descending, very convenient. The only nitpick I had with this was the rubber feet on the hydraulic pump unit - they clip into holes in the base of the pump frame - and any little movement and those feet would pop out. I quickly lost one.
Original rubber foot on right (note tab), and upgraded rubber foot on left. 

Hydraulic Pump Frame with the rubber feet that pop out easily
 This got annoying pretty quickly, so I got online and purchased some replacement rubber feet for the hydraulic pump frame. I was careful to size the hole in the new rubber foot so that it would be compatible with the holes on the pump frame. The optimal hardware size was 5mm (about 3/16 of an inch).

5mm Stainless Steel Hardware with Upgraded Rubber Feet

Conclusion

Simple project, quick and easy, no more running after the rubber feet for the pump frame.
Upgraded rubber feet installed on the Quickjack Pump Frame with 5mm Stainless Steel Hardware

Sources and Links

I have some spare hardware from this project so I'm selling some of these as kits - if you're interested, you can purchase them on eBay here: Listing 173979355180
Share:

BMW 535xi Touring E61 Tailgate Hydraulic Strut Popping off the Ball Joint - Set Screw Repair

My BMW 535xiT is my daily driver - use it for going back and forth to work every day and running all the errands to keep the household running. So - the tailgate and back window get lots of use. The car was manufactured in September, 2009 and now has 175,000 km on the odometer, and since BMW hasn't inported the 5 series touring to North America since 2010 - it looks like I'll be hanging onto this car for a while longer. The 3 series touring is too small, I'm not an SUV kind of guy, and I'm not ready to go to a Mercedes E series wagon just yet...

The completed set screw repair - neat and flush. 
So - about 6 months ago the hydraulic strut in the tailgate stopped lifting all the way to the top of travel - it started sagging and making ominous noises. So - I took the time to dig out the hydraulic pump and reservoir, replace the fluid with the BMW service kit, change the 10mm strut ball and get the tailgate functioning well again. I wrote about all that here.

Well - it took about 3 weeks until the hydraulic strut started popping off the ball - you can see the state of the bottom socket on the hydraulic cylinder here, there was finally enough wear that it wasn't going to stay in place.


This is not good....
This isn't good either....
So - just to keep the socket engaged, I cut a piece of styrofoam to jam in behind the strut to try to keep it in place - that worked fairly well for about a month, then the strut would pop off about every time I opened the tailgate, and it was time to make a more permanent repair.

There was a good discussion on the 5series.net forums, the idea that I decided to try out was a set screw. I did a bit of research and found some really nice ball tipped set screws and decided to try them out. 

5mm ball tipped set screws
So - I ordered a lot of these set screws and set out to do the repair.

To drill and tap a 5mm hole - you need a 5mm tap, and a 4.2mm tap drill bit
First step is to dismount the strut from the tailgate - you need to remove the plastic trim on the left side of the window. There's a small clip you need to get out of the way to get the trim off. 

Lift the trim underneath the window to get this clip out of the side trim.
Removing the lower half of the left hand tailgate trim - once this is removed, you can remove the hydraulic strut. 
With the hydraulic strut removed, it was time to set the hole placement for the set screws, and drill two holes - one on each site. I put a small sheet of plywood on top of the security screen - was very useful to support the strut during the machining.

With the strut removed, it's easy to rotate to drill and tap the set screw holes. The plywood makes a good work surface.
I aimed the drilling to intersect close to the steel circlip. Very important to use a pilot drill to locate the holes properly - a pilot hole of 2.5mm would be perfect before drilling out to 4.2mm which is the tap drill size for a 5mm tap. 

Drilling each side of the strut base. 
The first hole on the top side - this hole walked a bit because I didn't use a pilot drill hole - don't make the same mistake I did...

Aim for the steel ring clip...

With the first hole tapped to 5mm - testing out the set screw. 
With the holes drilled out to 4.2mm tap drill size, it was very easy to tap the holes - this is a fairly soft steel part and it cuts well. 

Strut replaced, and the set screw does a great job holding the strut in place. The bottom set screw is easily accessible.
To access the set screw on the top side - its easiest to access with the window open and the left side trim off.
A dab of blue Loctite will hold the set screw in place, keep it from backing out. 
In case anyone is interested, I've created an eBay listing to sell the surplus set screws from the lot that I had to purchase - you can purchase the set screws here at eBay listing 183298383219.
Share:

BMW E61 5 Series Wagon Hydraulic Tailgate Lift Repair


Today I spent about 5 hours repairing my hydraulic tailgate actuator. There lots of discussion about this issue on the forums, I thought I would add some photos from my experience to help those considering or performing this repair.

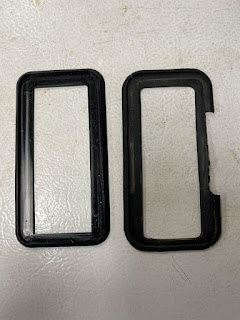
Correct oil level should lie within the "X"
You can see the oil level is quite low - about 25mm below 
What was wrong? The hydraulic system sounded like it was straining to lift the tailgate. Did not sound normal. The tailgate wasn't lifting up all the way - was settling back down about 10cm lower than normal. And - the hydraulic actuator on the right side of the tailgate started popping off the ball joint - when that happenned, the lift would not operate normally and had to be reset by hand.

So - did some research, and then ordered the following parts:

1. Pressurized gas cylinder for the right hand side of the tailgate.
2. A pair of new 10mm ball joints
3. The hydraulic repair kit from BMW - which includes some hydraulic fluid and a bunch of small parts.

Then - I got started.

If you are going to top up the hydraulic fluid - start by opening the tailgate, closing the tailgate, then opening the tailgate again. This bleeds the system.

Start by supporting the tailgate with something solid - like a painting pole
I started by switching out the right side gas pressurized strut. I removed the old one - it just pops off the ball joints with a bit of gentle force.

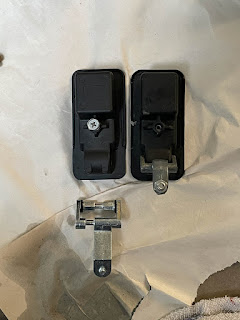
E61 Gas Pressurized Struts - New on the Right, Old on the Left
I then took a bathroom scale and measured the force of each strut compressed about half way. The old strut had a force of 96 pounds half compressed. The new strut has a force of 138 pounds half compressed - a little over 40 pounds different. This may explain part of the reason why the hydraulic system sounded like it was straining. Replacement struts are not that expensive, even from the dealer. The new OEM strut even comes with a dab of grease inside the ball joint so that it is ready to install. Check yours - make sure it is greased to protect the ball joint from wear during opening and closing.

Old vs. new ball joint for right hand side gas pressurized strut.
Not bad condition overall. 10mm diameter ball.
With the gas strut changed - I then turned my attention to the left hand hydraulic side. I began by popping off the hydraulic actuator and trying to replace the ball joint.

Left hand ball joint - rusted and frozen in place
It was jammed, and I stripped the hexagon faces trying to remove it dry. So then I soaked it with penetrating fluid, and got onto it with a pair of vice grips.

Penetrating fluid helped a lot. Vice grips tore up the ball joint, but it ended up finally coming out. 
So - I decided to top up the hydraulic fluid while allowing the ball joint to soak in penetrating fluid. Every 10 minutes or so over 3 hours I added another squirt of penetrating fluid. On to the hydraulic system.

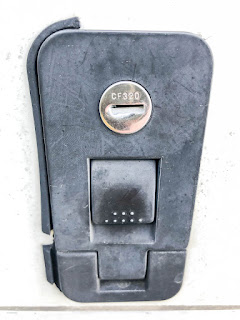
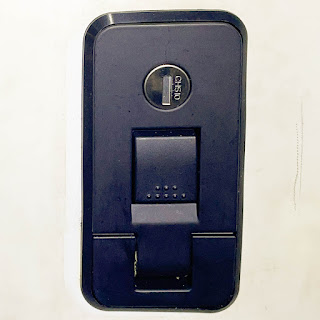
Hydraulic pump is just underneath the left rear access panel. The radio module is Sirius satellite Radio. 
Start by removing the left rear access cover - it just unclips and comes off. Next, remove the radio module if you have one - 4 screws hold the radio module to the bracket, then 4 screws hold the bracket to the car. I didn't bother removing the radio wiring harness, I just let it hand from the back of the car during the repair.

Hydraulic pump exposed - correct oil level runs through the X - you can see the level is quite low.
There are 2 nuts holding the bottom of the hydraulic pump bracket, this comes out with a 10mm socket. The upper part of the bracket is held by an 8mm hex head screw - comes out well with a 1/4" drive socket and short extension. 

Upper bolt removes with 8mm socket, short extension. 
By the way - make sure you have a nice 1/4" drive socket with a fairly light mechanism - you'll thank youself. The folding handle is really convenient in these tight spots.

Once the bracket is undone - you go underneath the bracket and remove 3 nuts holding the pump to the bracket - 6mm. 

Once the pump is freed from the bracket - reach up to the top and free the hydraulic lines from a small clip, and free the electrical harness from a zip tie clipped to the bracket. Once these are free - the pump is free to descend. You'll also need to remove the electrical connections - one plastic connector, and two individual wires that connect to the motor underneath a black plastic circular cover over the motor. 

Motor power connections under the black plastic cover. 
Then you can continue following the BMW instructions. I drained all the oil from the reservoir into a small pan.

Draining the oil from the reservoir. 
The drain plug is a small metal plug in the very bottom of the plastic reservoir. You don't need to (or should not) remove any of the hydraulic plugs from the pump. Then you can refill the reservoir. If you purchased the BMW kit - you'll have a new drain plug complete with O-Ring to reseal the reservoir.

Installation is the reverse of removal. Redoing the electrical connections is a bit tricky. Once the electrical connections are replaced - test the tailgate before bolting everything in. It might saving you having to remove the pump a second time to check the motor connections (from my experience...).  

BMW repair kit contents. The bottle of oil has a nipple the same size as the drain fitting on the reservoir - very nice. 
Then I went back to removing the left side ball joint. Three hours of penetrating fluid loosened it up - it was still very difficult to remove.

Chewed up the old ball joint removing it with vice grips. New 10mm ball joint on the right. 

Use lots of anti-seize on the new ball joint - might save the next owner of the car a lot of trouble. 

Socket at the end of the hydraulic actuator needs cleanup. 
So - I cleaned up the socket end of the actuator - toothbrush and penetrating fluid to get all the rust and crud out of the socket. Then I blew it dry with a bit of canned air, and filled it with waterproof grease. I popped the socket back on the new ball and it held.

Cleaning out the socket. 

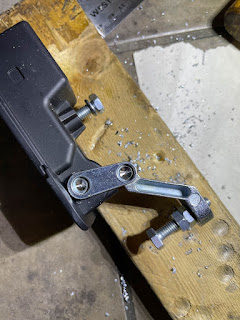
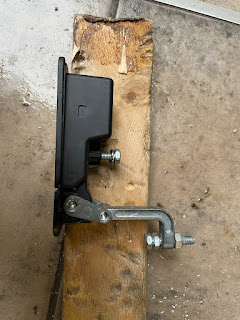
Completed repair. I put a small section of stiff rubber fuel line next to the actuator, just to give it a bit of support to help it keep from popping off again. I'll update the post if this works. 
So - about 5 hours to do this repair from start to finish. The topped up hydraulic system works nice and smooth - like new - no sound of straining. The tailgate now closes and locks with a firm click. All good. 

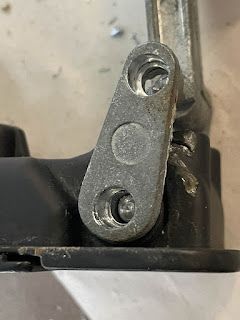
The culprit - worn ball joint - chewed up by removal with vice grips. 

Update - 2 Years Following the Fluid Top Up

I use the car daily, use the glass window typically daily, and the liftgate hydraulics multiple times a week, several times an outing. So - the liftgate sees regular service. After about two years - my hydraulic strut developed a leak at the rod seal, and eventually the oil loss was enough to prevent the liftgate from going to full extension. I just recently replaced the hydraulic strut, and rebuilt the pump. I've completed a new post on the pump rebuild at this link. I'll do a new post on the cylinder replacement as soon as possible.

Sources and Links

The replacement 10mm ball and fluid kit was sourced from my local BMW dealer - Park Avenue BMW in Brossard. Total cost was in the order of $200.


Share: