Repairing Cargo Latches and Replacing Seals on a 2001 27EXB (28E33B) Glendale Titanium 5th Wheel

We bought this 20 year old RV earlier this year. One item to repair were the cargo latches on the flip-up door next to the bunk beds. The spring action in the latch was weak - so when you depress the release tab, the lever would not spring up to open the latch. You would have to reach under the level with a fingernail and try to pop it up. In addition, the latch seals were completely rotten, allowing water to get into the door can causing the start of some black mould and rusty hardware.

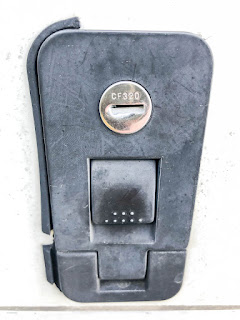
Starting point - seal half gone, weathered latch body

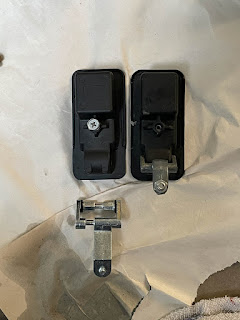
Some exhausting internet research and I managed to find the same latch for sale on an Asian e-commerce site, however, the inside lever which holds the latch closed did not match my latches. I couldn't find an exact match anywhere, so I decided to order the similar latch and attempt to swap the inside levers from my old latches to the new latch body with new springs and lock cylinders. 

New latch with the shorter inner level. Drilling out the rivets holding the inner lever on the latch.

A few weeks later the new latches arrive, and luckily, they are physically similar. I start by disassembling the inner lever on one of the new latches by drilling out the rivets. The rivets are actually part of the inner lever casting - so when I did the same on the old latches I was very careful to remove a minimum amount of material with a twist drill to facilitate reassembly. 

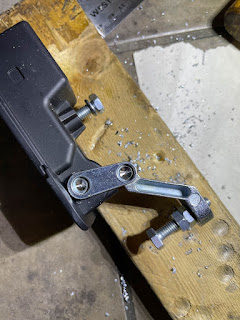
With the rivets drilled out, the inner lever pulls apart from side to side.

It was then straightforward to transfer the inner levers from the old latch onto the new latch with new springs. The dimensions were all accurate, the o-ring seal which keeps water out of the latch mechanism was transferred off the old inner lever to the new inner lever and everything went back together with some gentle tapping and plier pressure. 

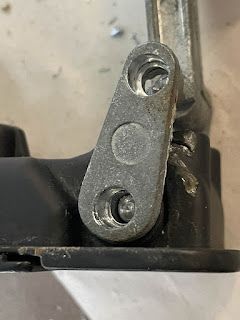
Old latch and inner lever - rivets drilled out and separating the two halves

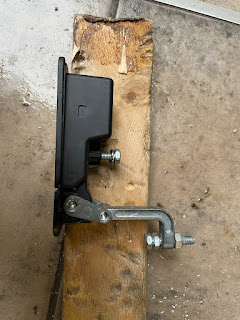
Reassembling the old inner lever on the new latch - the wood protects the finish on the latch when tapping.

With the inner levers swapped, it was simple to reinstall the latches in the cargo door with the new seals provided with the latches:

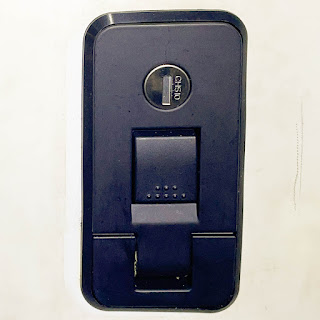
New latch installed with new seals

Here's a photo of the old seal next to the new seal - this was the better of the two old seals - the other seal had completely disintegrated.

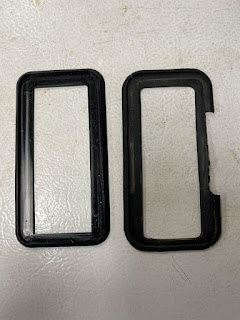
New and old latch seals

Finally - I reached out to the latch vendor, and ordered some spare sets of seals if you just want to replace your seals. Just click on this link to take you to the sales page on eBay.


Share:

A&E Dometic 8500 Awning Repairs on the Glendale Titanium 27EXB

This post is part of the RV project series. In January 2021 we purchased a 2001 Glendale Titanium 27EXB for a good price, which needed a fairly significant amount of work. Check out all the articles here. The first time we opened the awning was on our first weekend camping trip, and we found the following problems. 

A&E Dometic 8500 series awning

Broken spring on one of the support arm lift handles - pin won't engage in the support arm holes

Lift handle removed, the pin is still there, but with a broken spring it won't engage on the support arm holes
Cracked hardware joining the rafter arm to the support arm

Repairs to the broken lift handle was fairly straightforward. Drill out the rivets holding the lift handle to the support arm, and then use the rivet supplied with the Dometic replacement part to reattach the lift handle to the arm. This repair took about 20 minutes from start to finish. While the lift handle was broken, to use the awning, we used a screwdriver inserted into one to the support arm holes to extend the support arm. 

Removing the broken lift handle by drilling out the rivets

Another issue was cracked hardware joining the rafter arms to the main support arms. There is a complicated casting that slides in channels in the main support arm. In my case these castings were cracked and very close to failure. 

Notice the cracks on the left and right of the white metal casting. Ready to fail.

My RV repair shop had the appropriate parts. The first step in the repair is to remove the rafter arm extension which is riveted to this hardware piece from the main support arm. To do this - you need to momentarily lift off the casting at the top of the support arm which supports the awning roller. Important - this casting is under spring tension - when you lift it off it will let off the tension on the spring of the awning if you don't restrain it. I used a set of vice grips to hold onto this casting to keep it from spinning, and I supported the weight of the awning roller on the top rung of an adjustable ladder while performing the repair. The awning needs to be opened in order to remove the rafter arm. 


Vice grips with a piece of plastic protecting the finish of the piece. Ensure the vice grips are securely attached so that spring tension doesn't cause the casting to spin.


Supporting the awning with an adjustable ladder. Here, the rafter arm is being replaced with new hardware.

Replacing the hardware element is fairly straightforward. Drill out the rivet holding the hardware element to the rafter arm, and then replace the part with a new rivet. The trickiest part is forming the head on the new rivet - it's not a pop rivet, so you need to use a ball pien hammer and punch to form the rivet head correctly. 

First step is to drill out the rivet to release the old part

Install the new part and insert the new rivet

This is the rivet head before forming. I used a roll pin punch with a rounded head to splay out the rivet material, once it was in a cone shape, I used the ball end of a ball pien hammer to roll down the rivet material and finish installation.

These are the old parts - note the damage to the part on the right. I replaced both parts since I was at it.

Total time for this hardware repair was about an hour. You need to extend the awning, and finding the method with the vice grips to keep the support arm upper casting from spinning took some time. 

The next issue with the awning was a series of cracks and holes along the top edge where the awning material is exposed to the sun when the awning is rolled up. I simply used a roll of CAMCO clear awning repair tape to fix these cracks and holes. I performed the cleaning stages carefully - first pass with rubber roof cleaning agent did a fantastic job removing dirt and grime and getting the surface quite clean. Then - prior to applying the tape, I used rubbing alcohol to remove any traces of grease which might keep the tape from adhering properly. This tape is very sticky, applies easily. I used a clean cloth to work the tape into the awning fabric for good adhesion. So far, so good. 

Camco clear awning repair tape applied over cracks in the awning fabric

Feel free to ask any questions in the comments section below. 


Share:

Another new project - the COVID pandemic Fifth Wheel RV Recreation Plan - Ford F250 and Glendale Titanium 27EXB

Just when I thought I had enough on my plate, my wife and I decided to finally execute on the RV project we've been thinking about for years. We've rented C class motorhomes a couple of times now - I always liked that when you rent an RV - someone else takes care of winter storage, repairs, license, insurance, and all the rest. The only downside is the availability of a suitable unit that fits your family. The last C class rental we did, the arrangement of the bed didn't fit well with our family and schedule. The kids are too old now to share a bed, so that means one kid is down on the couch in the middle of the RV, and if that kid is a late sleeper, you have a problem when trying to get going in the morning in the kitchen. And so on.... 

The other issue with the C class is that you need to tow a vehicle if you plan on setting up camp and sightseeing - not impossible, lots of people do it, but this is impractical with a rental. 

So - we ended up going with a pre-owned 2012 Ford F250 4x2, and a pre-owned 2001 Glendale Titanium fifth wheel - 27EXB with bunk beds in the back for the kids. We made the purchase in January and are getting things set up and organized for this summer. 

2012 Ford F250 4x2 Gray Metallic with 2001 Glendale Titanium 27EXB

The truck is well suited for towing the RV - full crew cab so everyone has lots of room, and full 8' box for 90 degree turning capability with the fifth wheel. I'm happy with rear wheel drive - we don't plan to use the vehicle too much in the winter, and it has the electronic locking rear differential to put power to both rear wheels when traction is limited. The lack of 4WD saves some weight and complexity. 

I found a used Reese Titan 16K fifth wheel hitch which I installed with new rails. No need for a sliding fifth wheel hitch. Installed this myself on a Saturday, pretty straightforward. 

Installing the universal bed rail kit for the Reese Titan 16k Hitch

There were plenty of used fifth wheel hitches for sale in January - I ended up going with the Titan because of the urethane bushings which help isolate trailer motion from the truck frame. On my initial haul returning home with the fifth wheel, I was really impressed by how quite and stable everything was. Other than the weight, you really don't notice the trailer unless you're on rough pavement. 

Reese Titan 16k Fifth Wheel

The hitch will need a bit of love, the grease fittings were seized, the jaw bushings were ungreased, and there is some rust on the frame to touch up. 

On the trailer - we got it for a good price, however there is some water damage and structural issues to take care of due to a few years of neglect. The RV is booked for the structural / water damage repairs in March, more on that in future posts. 


Share:

Hydro Quebec Flex D Rate - Controlling Clothes Dryer with Insteon EZIO relay

We're just over half the peak demand season in Quebec, so far, so good. Will write up some articles on what I've done so far. On one demand management period a few weeks ago, someone in the house started the clothes dryer, I caught it after it had been running for about 10 minutes. One of the problems with the whole energy management / peak demand implementation is that it is difficult to get everyone in the house on the same page. I understand that at $0.50 per kW-hr - running the dryer for an hour ends up being an expensive proposition. It's harder to get the two 12 year olds in the house to understand. 

LG Clothes Dryer - Cover Off, Control Board back left of the photo. Relay will go close to control board

For avoiding future problems with the dryer, I decided to implement an interrupt to prevent the dryer from starting during a peak demand event. We have an LG dryer with an electronic control board. I didn't want to get into switching the power feed to the dryer - it's a large circuit. I decided to try interrupting the door open switch, effectively putting a second switch (relay) in series with the door open switch. 

Opening the cover of the dryer exposes the wiring and control board. Cut the power before opening the dryer cover for obvious reasons. The wiring diagram was attached to the inside sidewall of the dryer, and still quite legible. 

LG Dryer Wiring Diagram

The dryer switches 120V (one leg of the 240V), and it switches the connection to neutral. When open - it provides the neutral connection for the lamp inside the dryer, causing the lamp to come on. When closed, it provides the neutral connection for the control board. I decided to interrupt the neutral connection to the control board, in a fail safe fashion. My relay will be normally closed on the neutral circuit to the control board, so that if there is no control system, no connection to the relay power - the dryer will function normally. The interrupt feature will require 24VAC from my control system. 

Wiring in the relay with a relay base was quite simple - 4 connections. 

Relay with base installed on a short braket - no interference with top cover

The wire to the control board was a yellow wire according to the wiring diagram - very easy to identify. I simply cut the wire, crimped in two extensions to take the connection over to one of the relays normally closed pair of terminals. I use heat shrink crimp connections for a neat installation.

Connections made on the NC relay terminals - interrupt yellow wire (neutral to control board)

I ran a control wire down into the basement next to the dryer vent line - very easy in my case - and over to an automation panel where I had a pair of existing Smartenit EZIO 4x2 Insteon relays. I just selected one of the relay output terminals, and used 24VAC from the transformer in the cabinet. When going through the dryer case - I was careful to run the cable through a rubber grommet to avoid any shorts in the future, and ensured my cables were well attached to the dryer frame with zip ties. 

I just finished testing the connection. It works perfectly. When interrupted - the electronic control panel stays powered up, all the control lights are illuminated, but when you press the start button, nothing happens. The control board thinks the door is open and won't initiate the drying sequence. All good. This project was surprisingly quick and easy - took about 2 hours in total. Feel free to ask any questions down below. 


Share: